HOME BOAT-BUILDING
Joining hull and deck of the Swift Solo meant long periods of head scratching, says Jordan Spencer.
AT THE completion of stage five of construction of the Swift, I figured we were close to finishing, but the “devil is in the detail” as they say and there was a hell of a lot of detail still to come. Add in the resumption of the sailing season, plus some very busy times at work and stage six of the build stretched out over months. Conceptually it was pretty simple, bond hull and deck, paint and varnish it, screw in the fittings, rig the mast and boom and thunderbirds are go. The execution however was a little more complex.
I was keen to bond hull and deck, but before we could get to that, there were other priorities. First we had to decide on the control systems, because once the boat was bonded together, it was going to be difficult to create backing plates for the fittings if we changed our mind. I had all sorts of, you beaut ideas I thought about incorporating. Things like the mainsheet bridle adjusting automatically as I raked the rig, but in the end I went for a simple setup. However, I still wanted to adjust rake and rig tension on the water, allowing me to make quick changes when trying to work out what was fast, rather than wait till I hit the shore to make the big changes. This was essential, as the class is still fairly new and I can't find any accepted tuning guide. Plus the Australian rigs are different to the US rigs, so the need to experiment is high. The problem is, when designing the layout, you are doing so for the first time, so you are not sure if it is all going to work. Needless to say I took my time. I found my best thinking came just before drifting off to sleep at night. Hopefully everything will work.
The first hole
Another task before joining hull and deck was to cut the daggerboard slot in the hull. Up to that stage, everything had been about creating, not removing, so cutting a hole was a little daunting. You learn early any stuff-ups are easy to fix and I thought I'd have a little fun with dad. To work out where to cut the slot, dad was at the boat with tape measures, set squares and laser levels and as he was about to measure, I walked up with a drill, said “I reckon the slot is about here” and punched a hole. Dad walked off shaking his head, while I stuck my head underneath to make sure I was right. Luckily it was spot on, so it was out with the router to cut the slot. From there, with the initial stress of creating holes gone, we started ripping into the deck and laying out our systems. I was pretty fanatical about getting the rudder, centreboard, mast step and forestay in perfect alignment and also making sure the chainplate mounts were spot on. I also tried to spread my rig base as far as I could, so I put the forestay as far forward as the rules allowed and the chainplates as wide and as far back as allowed. This should provide for a more stable mast and allow the sailmaker to get a more effective slot. The chainplates were also bolted through a solid piece of cedar, so they should still hold even if the boat was blown up.
Bog and bond
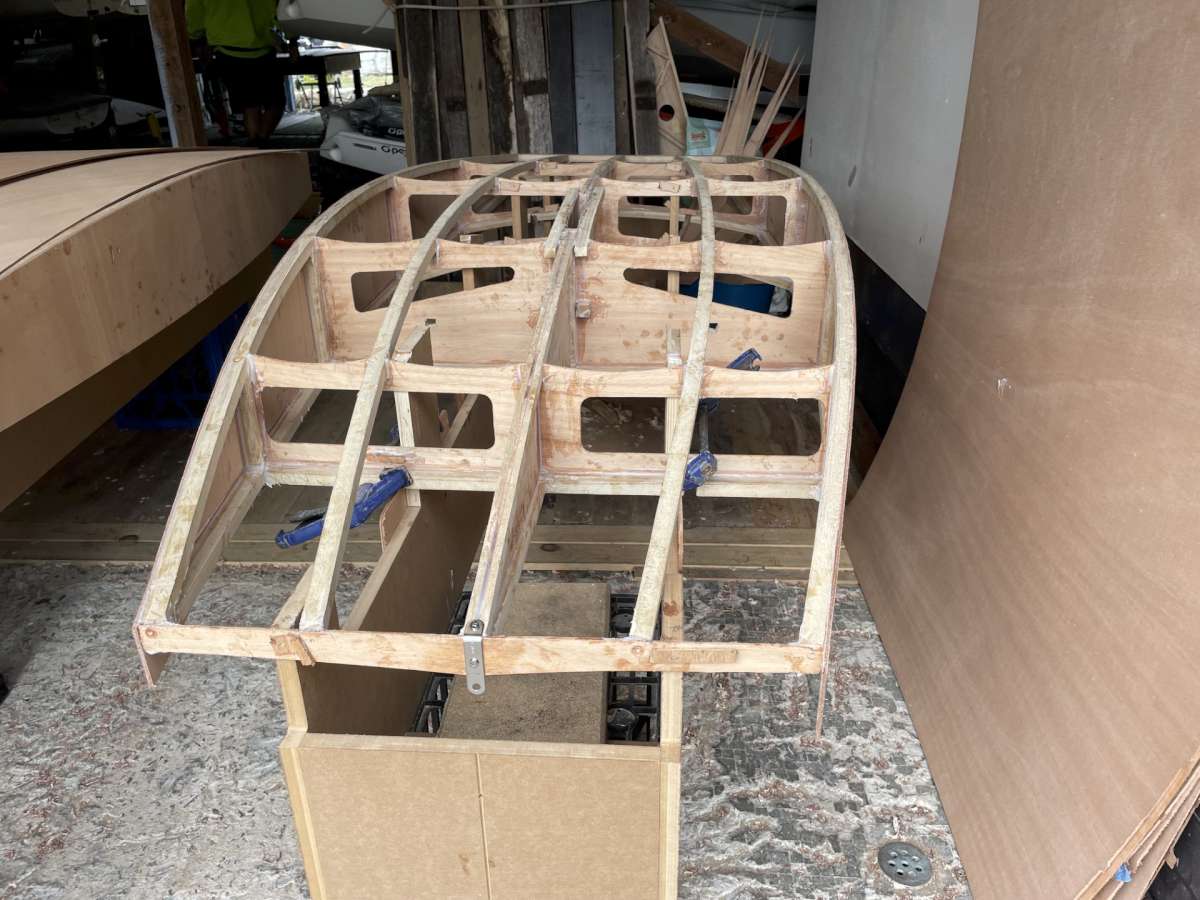
Finally though, it was time to bond the boat together. Here the designer has a pretty good suggestion. Rather than just plop some bog on the frames and drop the deck on and hope the two meet, he suggested we bond on some flanges to hold the glue in place and ensure a solid join. We did this, but before doing so, we put play dough across the top of all the frames, so we could check our alignment and minimise the amount of bog required. The flange idea was very successful. It also allowed us to apply the bog to the frames and have the deck on smartly. Which was just as well, as it was a very hot day when we joined the hull and deck, and time wasn't on our side. The end result was again, a very solid structure. There were still a million tasks to do, but we did take some time to reflect once it was together. We had built a boat … That lasted all of about five seconds and we were straight back into it.
We faired and glassed the gunwale join, cut the deck slot for the daggerboard. Bonding the mounting points for the jib track, spinnaker pole, control line mounts and the foot rails had occurred while the deck was still off, so we could through-bolt them for strength. Once everything was bonded in place, it was back to fairing.
Prime time
We started with the hull. As we had done a lot of work previously, it was simply a case of priming the hull. We had sourced the paint and primer from a local supplier and had negotiated with a spray painter to apply the final colour, but hull preparation was all down to us. I should say all down to dad. He pretty much did it all, applying primer and sanding, and when we presented it to the painter, he asked who did the prep work, because he reckoned it was the best job he had seen. Once the boat had colour on, it looked amazing.
The next step was to finish off the deck. We put on two more coats of epoxy and then three coats of clear polyurethane. These went on by brush, with a sand between each coat. I am still not 100 per cent happy with the result, but the good thing is I can leave it for now, go sailing and revisit it later.
Once we were done, it was just a matter of bolting the fittings onto the deck. For all our mount points we had drilled the holes, filled them with an epoxy bog and then drilled and tapped each point. Each thread that then went in was mounted with epoxy glue. The goal was to give strength and prevent any leaks. One of the problems of a sealed hull like this, is that once you pop it off the dolly into the water, the hull contracts and sucks air (and any water nearby) through all the fittings. So we elected to put in a breather tube to prevent this happening. Hopefully we will have a very dry (and fast) boat.
While all this was going on, we had the dolly built and refurbished some old 49er foils for the daggerboard and rudder. Starboard Products supplied us with a rudder box and we rigged out the mast and boom. We went to CST for that stuff. My goal with spars was to scale down an International 14 rig so there will be less trial and error in getting the boat to go fast.
No freebies
I like rigging spars. I like getting the setups spot on and I enjoyed putting mine together. This was the first carbon rig I had put together and so I had a few uncertainties. This is where my philosophy of sticking to Australian companies paid off! In this series I have mentioned all the companies who I have used as suppliers. Contrary to what many of you may believe, I haven't been getting discounts or freebies. Rather, I have mentioned them because they are Australian and I wanted to show that I am using Australian products. I could easily have sourced gear from overseas a lot cheaper, but I wouldn't have got the service I received. A classic example is CST. I spent a fair bit of time on the phone checking my rigging ideas would work. The net result is a perfect mast rigged correctly. Binks Marine was great too, giving me the run of its workshop and a lot of good ideas.
With the spars I made sure I sealed every hole I drilled or cut. Basically just epoxy with black tint. This should prevent any fibres coming loose, or any holes working larger. Also, any fittings that went through the spar were bonded in with an epoxy box, to prevent any weak spots. I also made my own spreader bases, building a jig to hold the spreader tubes in place so they were perfectly symmetrical and at the correct angle when mounted to the base. They were mounted with unidirectional carbon, bogged and faired, covered in S-glass, bogged and faired and then coated in epoxy.
The net result is, we are pretty much done. All in all there was a LOT of work, and what I have mentioned above, still leaves out plenty of the detail, but it is the detail and getting it right, that will make this boat a success. All that remains now is to get some sails made and go sailing. Woo hoo.
Bonding hull and deck with buckets of water for extra weight.
The first hole … routing the centreboard case slot.
Hull and deck joined, fittings on and nearing launch date.