
Practice all the skills when building Eian Mathieson’s explanation of his in-line fuel polishing system.
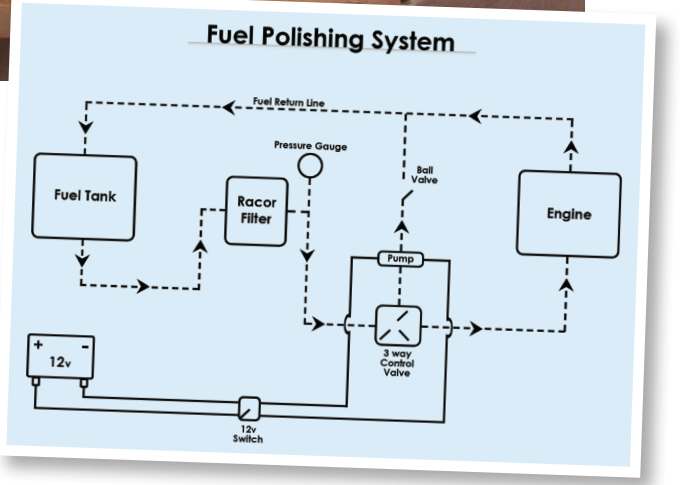
There have been a few articles on fuel polishing in past Cruising Helmsman in the past year (October 2015), but they motivated me to do it a little differently. I decided I wanted a permanent, in-line system to guarantee a safe and clean fuel supply to my engine and generator at all times. In addition, I wanted to be able to ‘polish’ my fuel if I was unlucky enough to cop a bad batch of fuel at some time. The following explains what I did and why.
Firstly, on my 42 foot sailboat, I have very limited space in my engine room. Secondly, the fuel tank is under the bed in the master cabin. It was critical for me to be able to have ready and easy access to this system. In the end I decided to locate my system at the fuel tank, under my main bed.
I was fortunate to have a perfectly sized empty space immediately forward of the fuel tank. Here I was readily able to tap into the main fuel feed and return lines. I chose a Racor filter and gauges; although they may cost a little more, I decided this was about both my safety and peace of mind, so I was happy to spend a little extra to go with the top tier brand.
I ended up with two Racor pressure gauges, this is because I wanted to be able to see my pressure at a glance and I happened to have an old basic Racor gauge on board from a previous owner. I mounted this in the cabinetry under the bed, now I only have to come to the cabin doorway and I can immediately glance at my running pressure while underway. Running this gauge to the cockpit was just a bit too hard!
The second, current model Racor gauge has a brilliant feature: a resettable maximum pressure needle. At the beginning of a motoring passage you can reset the gauge to zero and then, during and at the end of the passage, you can see at a glance the max. pressure reached.I mounted my Racor in a very basic timber slide frame thus allowing me to stow it out of the way.
When I want to work on it I simply remove the lock bar, lift the Racor up and then replace the lock bar to lock it into the up position. This allows full inspection and maintenance. I also placed a cheap push on/off LED light behind the fuel bowl to make it easier to get a clear view of the bowl contents. I used a small Walbro 12 volt fuel pump at a cost of just under $80, a nice stainless steel three-way flow control valve for directing flow after polishing to either the engine or the return to tank line. Obviously, the Walbro is only used for polishing, but can now also be used in an emergency as an air bleeder.
I also fitted a one way flow control valve to allow me to remove the Walbro from the line during normal engine operation. This system is much simpler than it may appear at first glance and I believe it is a pretty simple DIY project for any reasonably competent DIYer. Although I know I have a small amount of water and algae in the bottom of my tank, I know I can now passage with confidence that my new polishing system will keep me operational.
Eian Mathieson, an engineer by trade but an entrepreneur by choice, lives on Sydney’s north shore with his wife and three sons. Eian grew up sailing skiffs then graduated into his first real boat in the late 70s – a 28’ Daydream. Then along came children and he had to sell. Fast forward too many years and he is back on the water.
This article is from the April 2016 edition of Cruising Helmsman magazine.


